Guide 2. WP Cron - WordPress doesn’t have a built-in scheduler to run regular tasks, so to get around this it fires off a request to process wp-cron.php every time a visitor requests a page.
There are a couple of issues with this, firstly on busy sites this means this cron task will be running all the time - when it really doesn’t need to.
- On a small website with a few pages and a few hundred visitors a day wp-cron.php probably isn't a problem, but imagine a larger website with maybe a 100 visitors an hour. If each visitor reads your home page, and 2 others, that would mean that wp-cron.phpis being called 300 times an hour, 7200 times a day and so on. Plus, on a busy/large website wp-cron.php might take a few minutes to run.
Multiple copies of wp-cron.php can be started at once as well, because people don't wait in line to view your web pages! This means that more memory is needlessly consumed. It all snowballs into a horrible resource hog.
We've seen some busy sites running multiple instances of wp-cron.php tasks consuming over 200Mb of virtual memory each! This will quickly exhaust your cPanel accounts' allowed memory allocation - that's if it hasn't exhausted your CPU allowance already. This may cause your website to fail to operate correctly. - Of course the opposite could also be the case - if the site is well optimised and most of the page requests are being served from cache the request to process wp-cron.php may not happen as often as you’d like.
There is a solution, in both these cases - disable the WordPress cron and setup a cPanel cron job on a schedule you control.
- Disable the WordPress cron task
You’ll need to edit your sites wp-config.php file - this is normally found in the base directory of your WordPress installation. You can edit it using the cPanel File Manager (See note at end/below Article 1). Once you’ve opened the file, find the section that looks like this:
* @link https://codex.wordpress.org/Debugging_in_WordPress
*/
define('WP_DEBUG', false);
/* That's all, stop editing! Happy blogging. */Sometimes, often on development sites you’ll see define('WP_DEBUG', true); instead, which just means WordPress debugging is turned on. You can safely continue to follow these instructions.
Add the following immediately after the WP_DEBUG line
define('DISABLE_WP_CRON', true);
So that section now looks like this
* @link https://codex.wordpress.org/Debugging_in_WordPress
*/
define('WP_DEBUG', false);
define('DISABLE_WP_CRON', true);
/* That's all, stop editing! Happy blogging. */
Save the wp-config.php file. - Now you’ll need to add the CRON job in cPanel to replace this functionality.
Before you do this, think about how often you really need this scheduled.
As a rule if you only check your website once a day, then run wp-cron.php once a day. However you may want to run the CRON job more frequently:
• If you find that you are getting a lot of spam comments and Akismet is not keeping on top of it
• If you schedule posts to be published at specific times
• If you publish event details that start and finish at specific times
• If you run an e-commerce site with stock level control
• If you integrate with any other system that requires regular updates or syncs to/from your WordPress site.
Once you've set this up it's important that you monitor it to ensure all your site's functionality continues to work as expected, in a timely manner. You can always return to the CRON job in cPanel and adjust it's schedule at any point.
In any event we'd advise you run the CRON not any less frequently that once a day or any more frequently than every minute.
The command for the cron job you'll be setting up is:
/usr/bin/wget -O /dev/null https://www.mydomain/wp-cron.php?doing_wp_cron
We have a separate article on adding cPanel Cron Jobs Article 2 below there's a copy of this command in that article.
———— Article 1 ——-
File Manager
cPanel comes with a full-featured file manager and this article describes it's basic functionality, including how to access hidden (dotfiles) and setting file and directory permissions.
File Manager
You can find it at cPanel > Files > File Manager
You can use file manager for quick tasks; like uploading a single file or .zip archive (and then extracting it e.g. for a WordPress plugin) or setting file and directory permissions. For larger tasks, for example, uploading a full website we'd suggest using an FTP client.

Clicking the File Managericon will open the main interface:
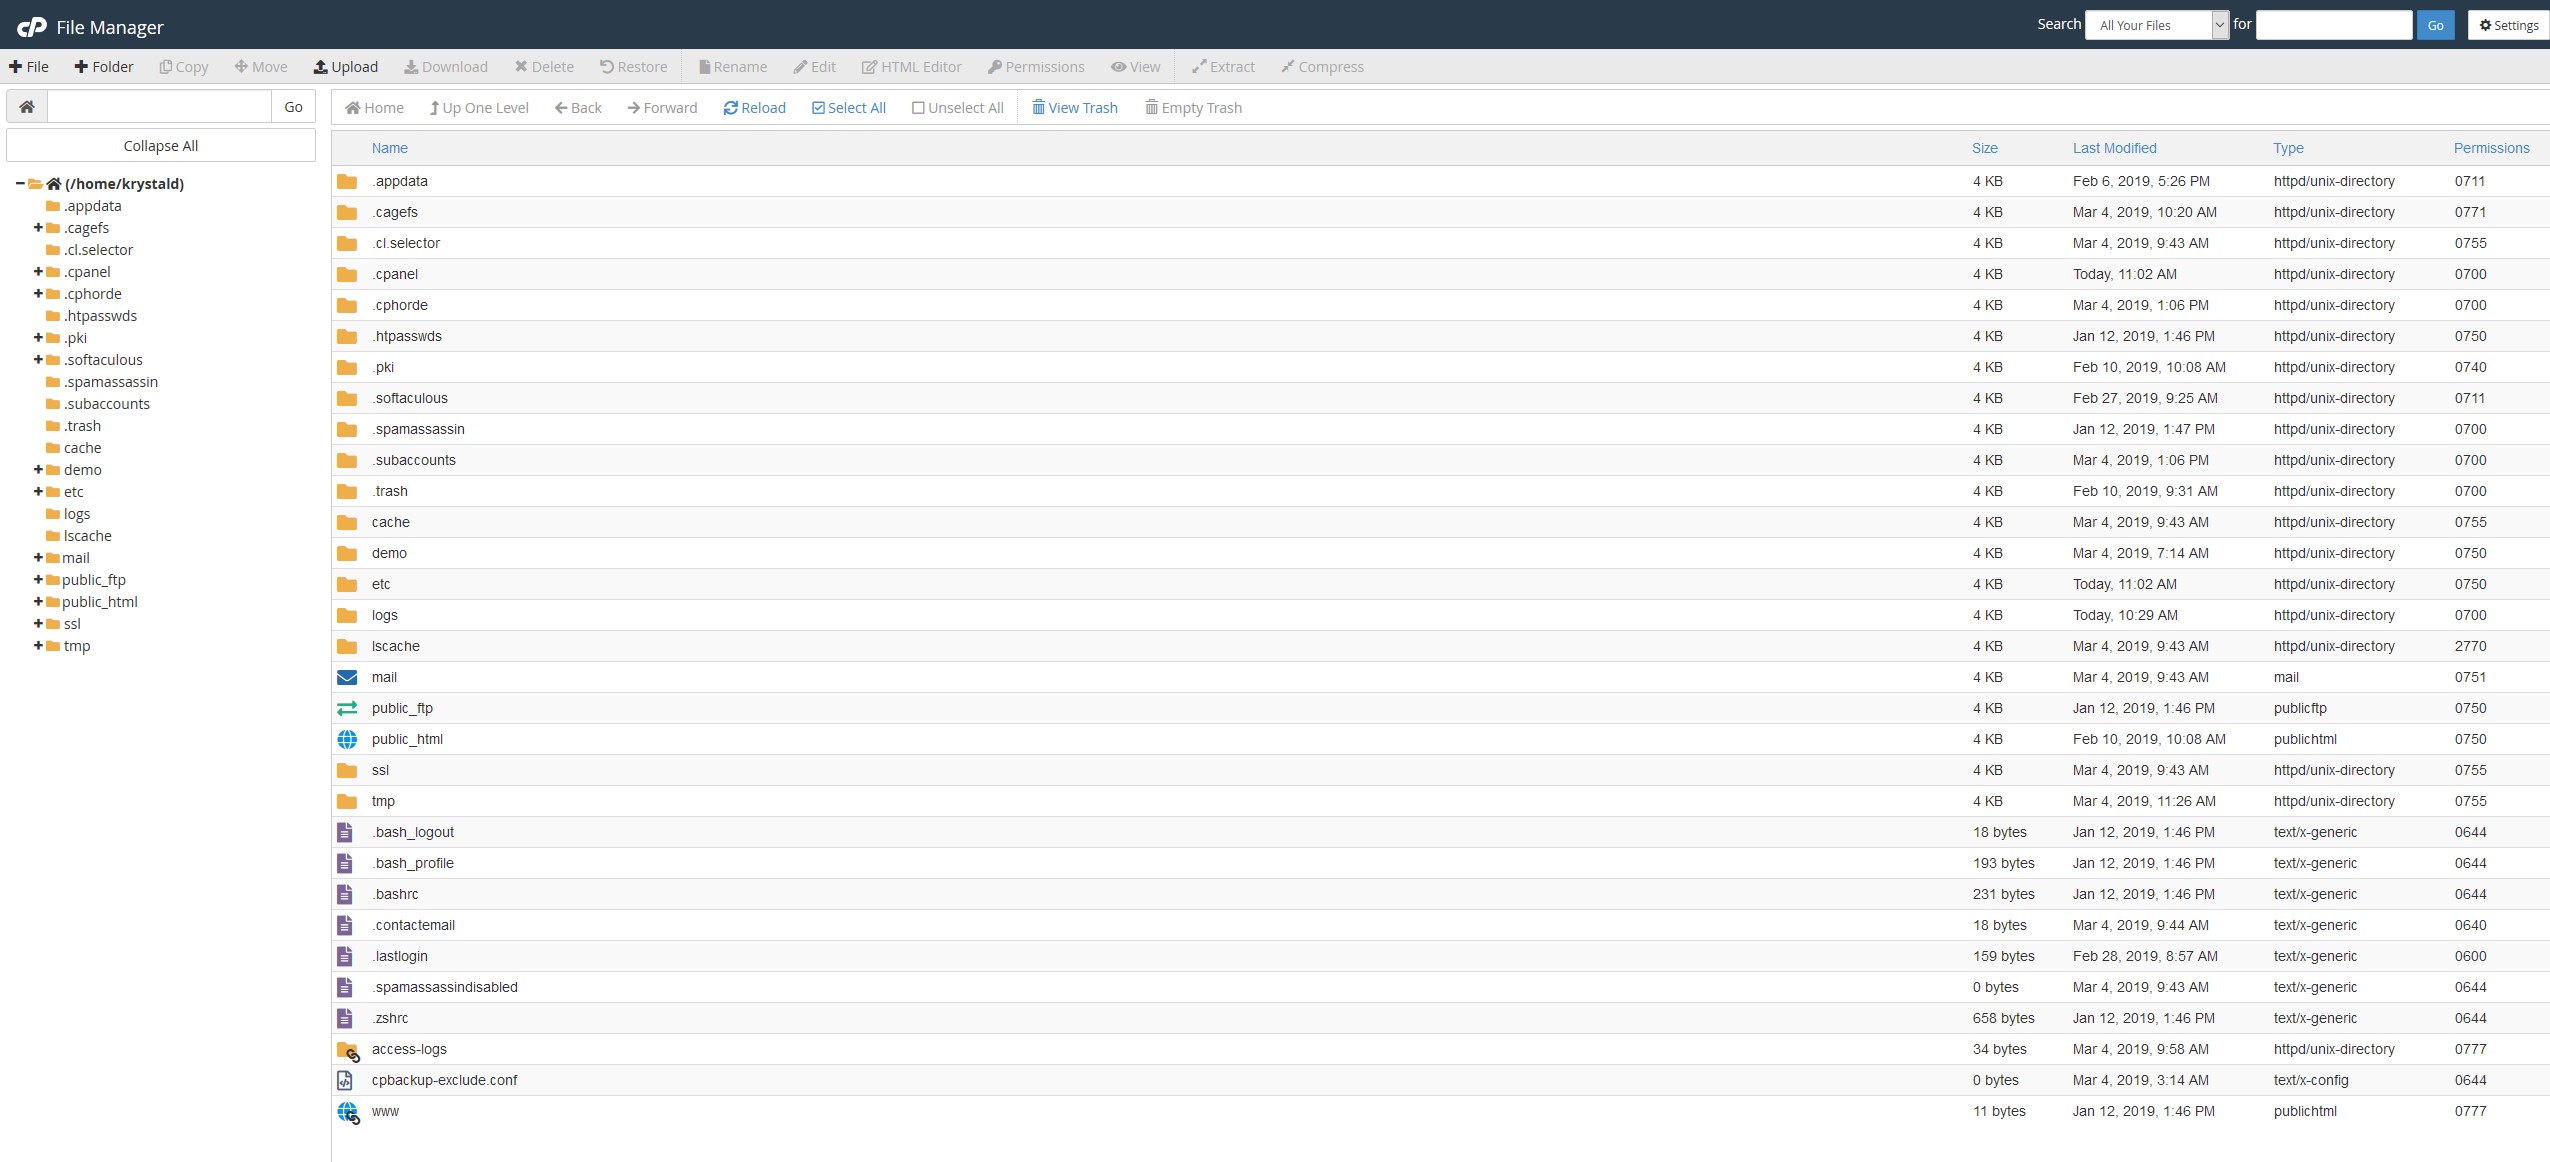
Along the top, you have the toolbar. The main pane is split into two sections, the left is a directory view and the right is the contents of the current directory. Your current directory will be shown emboldened in the left-hand pane so you can always see where you are in the structure.
The toolbar has all the controls you would imagine:
- Add a file
- Add a folder
- Copy (files and directories)
- Move (files and directories)
- Upload (files)
- Download (files)
- Delete (whatever you've selected)
- Restore (restores a file from .trash if you selected not to delete it immediately)
- Rename (files and directories - you can also double click the file or folder name)
- Edit (files)
- HTML Editor (html files)
- Permissions - see the Permission section of this document for more details
- View (files)
- Extract (an archive file)
- Compress (an archive file)
You can change directory by single-clicking the directory in the left pane or double-clicking the directory line in the right pane.
Be careful - in the right pane, if you double click on a file or directory name you'll be able to rename the file or directory:

Double click the icon, or the bar to change directory or open the file.
The toolbar above the right-hand pane also allows you to navigate as well as View and Empty the trash.
Deleting files or directories and the Trash
When you select a file or directory and click Delete, by default anything you've selected will be moved to the Trash and won't actually be deleted until you Empty the Trash. If you need to Restore something you've just deleted, click View Trash, select the files/directories you require and click Restore.
If you've ticked the box to skip the trash during deletion then you won't be able to restore your files here. Depending upon how long the files have been in place they may be available to restore from a backup. If you've only just created or uploaded them you'll likely need to recreate or reupload them.
Viewing hidden files like .htaccess
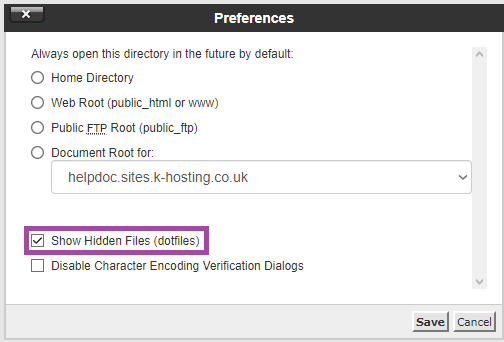
If you ever need to Edit your .htaccess file you can do that in the file manager. In order to see hidden files (those that begin with a full stop, called dotfiles) click on Settings(top right of the toolbar) and then tick the Show Hidden Files (dotfiles)checkbox.
If you're not seeing the files you expect when you open File Manager you can also check to ensure the correct default directory is set - normally this will be your Home Directory - under which you'll see all your files for your primary domain, addon domains and any subdomains.
Setting file and directory permissions
You can access a file or directories permission by either selecting it and clicking Permissions on the toolbar or right-clicking it and selecting Change Permissions from the menu.
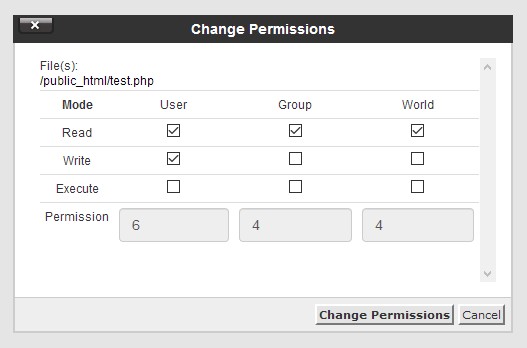
Here you and either tick/untick the checkboxes to select the permissions you require, or simply enter the appropriate numbers in the boxes. We have a separate article on permissions. If you need it please ask.
Article 2 - Setting Up A Cron Manager
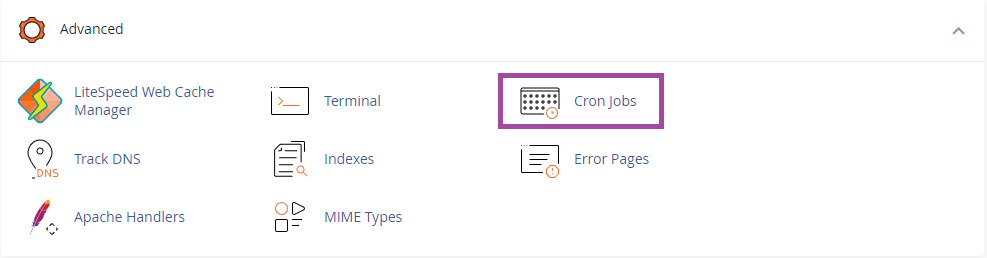
Cron is a task scheduler that is built into the Linux operating system. It is very flexible and allows you to schedule all kind of automated tasks. The cPanel Cron jobs icon in the Advanced section of cPanel provides a simple graphical interface to use this great feature.
The cPanel Cron Jobs facility is the best way to set up cron jobs on Krystal's Cloud, Premium and Business hosting. If you're running a VPS or dedicated server without cPanel you may want to setup Cron jobs via crontab files manually. Your system administrator will be able to advise on how and where to set these up.
cPanel > Advanced > Cron Jobs
Cron email notifications
Email notifications for cron jobs will be sent to the account's default email address.
You can change this in the top section of the Cron Jobs screen:
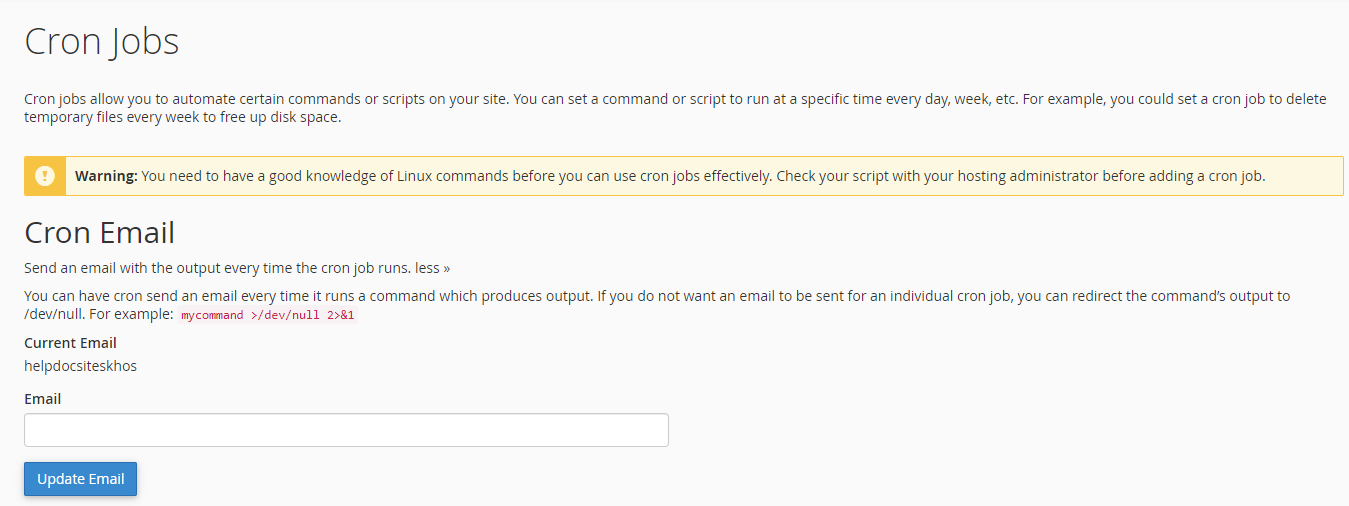
Simply type in the email address you'd like cron notifications sent to and click Update Email.
Adding a Cron Job
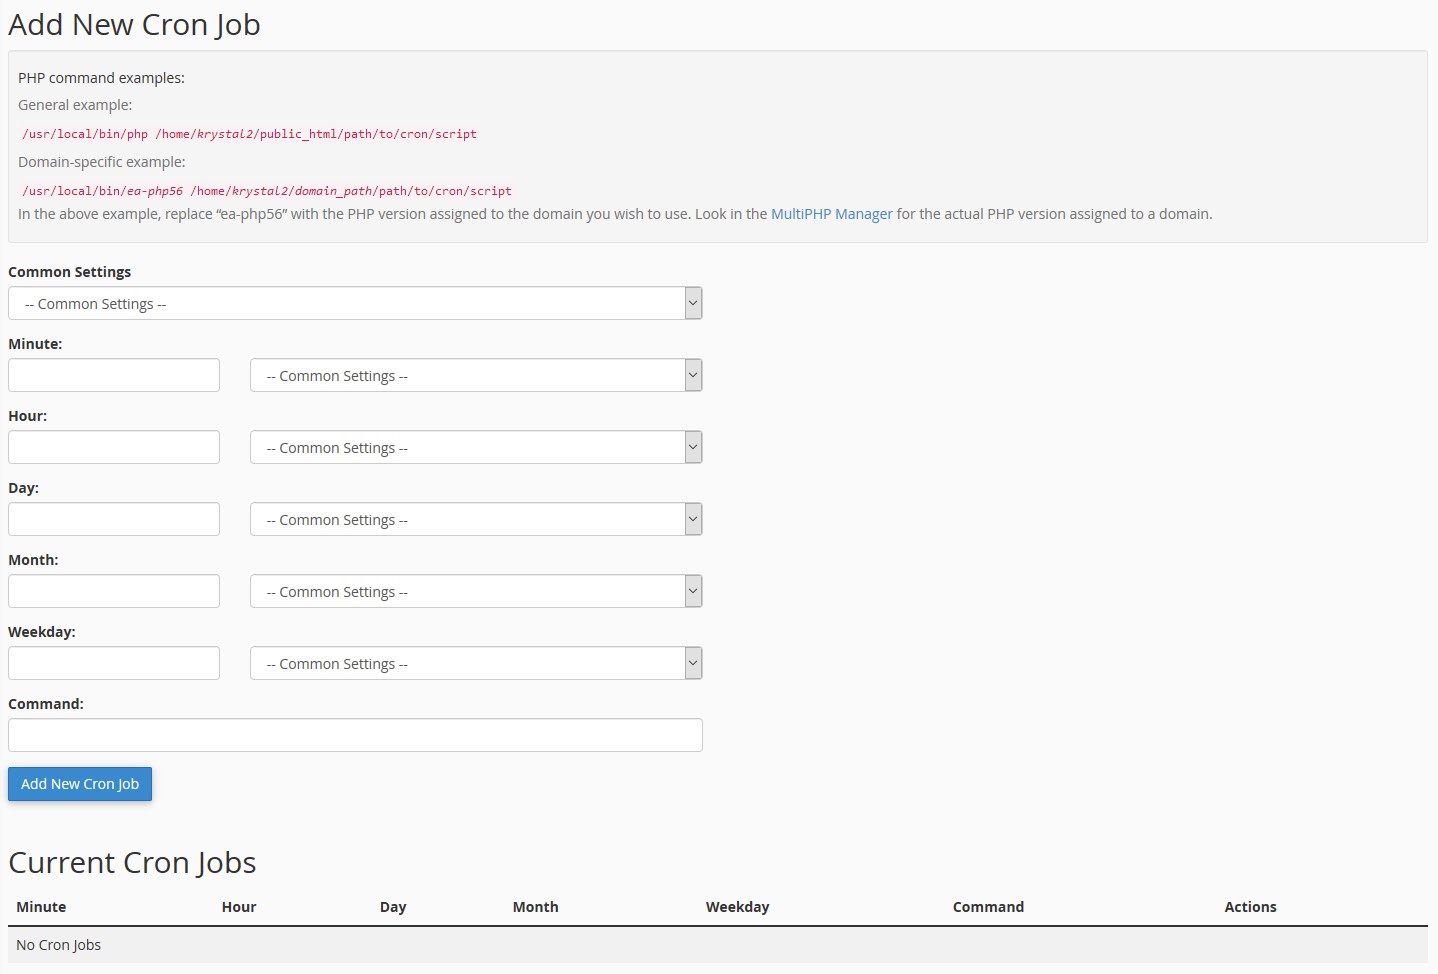
You'll need to tell cron how often to run this task - you can select from Common Settings, to enter all the details - or for more specific control choose your own settings for Minute, Hour, Day, Month, Weekday
Then you'll add the command required to run the task. This will normally be in the format <executable> <switches> <task command file>
So for a PHP task, your command might look like this:
So for a PHP task, your command might look like this:
/usr/bin/php -q /home/krystald/public_html/somedir/task.php
Where /usr/bin/php is the path to the PHP executable, -q is the 'quiet' switch - any output will just be sent straight to the trash, and finally the full path to the task command file.
Editing or deleting a cron job
Active cron jobs will be listed in the Current Cron Jobs section at the bottom of the page. You can Edit or Delete cron tasks here.
Clicking Edit will allow you to change the time and task details, click the Edit Line to save your changes.
Clicking Delete will show a confirmation Delete this cron job? - Click the Deletebutton to confirm and the cron task will be removed.
